Family * Travel * Food

Easy Gazpacho Made Without Juice

Today we're taking a refreshing plunge into the realm of gazpacho—a beloved Spanish classic that's perfect for savoring the summer season. Gazpacho is a chilled soup bursting with the essence of ripe tomatoes, crisp cucumbers, zesty peppers, and fragrant herbs. Its smooth texture and tangy flavors make it a tantalizing option for those seeking a light and invigorating dish. Whether enjoyed as an appetizer, a light lunch, or even a refreshing beverage, gazpacho offers a delightful respite from the sweltering heat. It's also a tasty way to get more vegetables into your diet. 

I want to share my version of this delightful chilled soup. Many recipes online call for canned or bottle tomato juice. This recipe is made from all raw fruits and vegetables. It helps a lot to use a high-powered blender to get a nice smooth consistency. Now if you want it chunky, you can blend it a little less. This soup is packed with flavor, and is so quick to make. 

Check out the recipe below

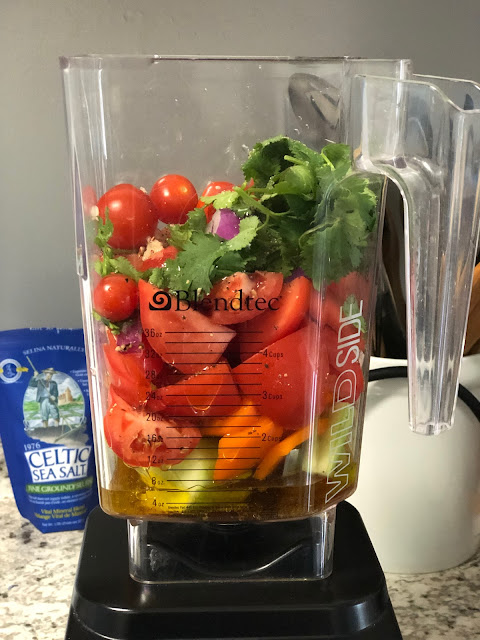
I didn't have quite enough Roma tomatoes, so I added a hefty handful of cherry tomatoes. 

What you will need 

For the soup: 
  • 5-6 fresh Roma tomatoes cut in quarters  
  • 1 small or 1/2 of a large red or orange bell pepper, cut in big pieces
  • 3/4 of an English cucumber peeled and cut in large chunks
  • 1/2 of a small red onion
  • 1-2 cloves of fresh garlic
  • a big handful of fresh cilantro
  • 1/4 cup of extra virgin olive oil
  • 3 tbsp red wine vinegar
  • sea salt and cracked pepper to taste, about a tsp each
For the topping: 
  • the remaining 1/4 cucumber dice finely (skin on)
  • cherry tomatoes cut into small pieces
  • cilantro
  • avocado chunks

How to make it

  1. Add all of the cut up vegetables except for the toppings into your blender. 
  2. Next, add olive oil, red wine vinegar, salt and pepper. 
  3. Blend on high speed until you reach the consistency you like. Taste for seasoning, and add additional salt and pepper if needed. 
  4. Refrigerate for at least 2 hours to allow the flavors to come together. 
  5. Top with the chopped veggies and a drizzle of olive oil if you'd like. ENJOY! 


Gazpacho is a versatile soup that offers a wide range of topping possibilities, allowing you to tailor it to your personal preferences. Traditional toppings include diced cucumbers, tomatoes, bell peppers, onions, and croutons, which add texture and enhance the overall flavor profile. You could even add cooked, chilled shrimp to make it a heartier meal. For an extra touch of elegance, consider adding a drizzle of high-quality olive oil or a sprinkle of fresh herbs like basil or cilantro. As for storage, gazpacho can be kept refrigerated in an airtight container for up to three days, allowing you to enjoy its refreshing taste and vibrant colors over multiple servings. So go ahead and explore the endless variations and toppings to create your own delightful gazpacho experience, perfect for cooling down during hot summer days or whenever your taste buds crave a burst of Mediterranean flavors!
SHARE:

Learn to make a genuine Thai Khao Hom Mali at home

Southeast Asia has many beautiful landscapes to offer and an interesting culture behind which can also be learnt through its food. As a region, it’s pretty diverse and every meal mirrors that diversity, so much so that you’ll find very simple dishes next to most intricate ones, not only in terms of ingredients but in terms of the elements used. 

What can’t be denied is the fact that they, sometimes, may be seen as weird and bizarre because of the combination of ingredients. However, the landscape offers a wide variety of fruits, vegetables and crops. That’s the reason why rice is such a staple element in this region. Moreover, this gastronomy is rich in seafood and herbs. All that combined gives as a result diverse textures and flavors. 

Rice types and Khao Hom Mali

Jasmine rice is a typical medium-grain rice type used in this gastronomy because of what its name describes: the fragrance it releases when cooked. It can be steamed or boiled, but, common to every recipe, as this type of rice is gummier and creamier than other kinds, the process of cooking has some specific steps. For example: you need to rinse it three or four times before cooking in order to get rid of most of the starch. Besides, once it is fully cooked and strained, you’ll need to move it around with the help of a fork so that the grains stay separate, otherwise, the rice will compact as it cools down.

However, the true secret to cooking rice is to know the proper water to rice ratio. In the case of Jasmine rice, you’ll need one cup of rice and 1¼ cup of water. Depending on the cooking method, this is generally the best way to do it. And last but not least, the heat should be low for the grain to cook evenly.

One country, one recipe

Now, as for jasmine rice recipes, as said, every region and country has its own delicacies to offer so, let’s focus on how to cook the rice first and you’ll find two Jasmine rice-based dishes you can make from different countries. Either of them will be a pleasure to make and eat.

How to cook Jasmine rice

Rinse the rice two or three times under abundant cold water.

Pour three cups of water and 2½ cups of Jasmine rice.

Cover the pan and bring to a boil. Once it boils, take the heat to low and cook for fifteen minutes.

A pro tip is to let it sit for five or ten minutes with the heat off and the lid on before serving or using.

Thai Basil Chicken

Ingredients:

2 cups of rice.

1 onion.

2 cups of ground chicken.

Soy sauce.

Fish sauce.

Fresh parsley.

Basil leaves.

2 tsp of salt.

2 tsp of pepper.

Preparation:

Preheat some oil in a wide saucepan and add the minced garlic and the diced Thai chili. Fry that for a minute and add some previously peeled and diced onions. Sauté the onions for 2-3 minutes.

Take the ground chicken to the pan and break it up with a fork. Fry it for at least five minutes or until it’s golden.

Pour some soy sauce and then some fish sauce. Mix and blend everything together. Keep frying for an extra two minutes. 

Season with salt and pepper to taste. Stir continuously.

Place some roughly chopped basil and fresh parsley.

When the chicken is ready, serve with the previously cooked Jasmine rice. 

Vegetable rice

Ingredients:

1 Onion.

2 cloves of garlic.

Ginger.

1 carrot.

Bay leaves.

Green beans.

1 cup of Jasmine rice.

Preparation:

In a wide pan, sauté some previously peeled and diced onions together with minced garlic and some ginger. Do so for a couple of minutes, until the onion is translucent.

Now, add a diced carrot, roughly cut bay leaves and some green beans.

In this case, you’ll cook the rice here, add the rice and toast it. Stir continuously so it doesn't burn.

Then add the right ratio of stock (you’ll save time if you have it already made).

Season the mix with a teaspoon of salt and one of black pepper. You can also use some paprika.

Bring the mix to a boil and at that point, reduce the heat, as explained before.

Turn the heat off and let everything rest for ten minutes before serving.

SHARE:

4 Reasons Why Sweet & Spicy is the Best Flavor Combination

Sweet and spicy, also known as sweet heat, is such a classic and delicious combination- yet many forget to include it in their diets.  Not only is there room for this in every meal and dessert, but it's also something you might find yourself starting to crave over time. 

These are the top four reasons why sweet and spicy are the best flavor combination and why everyone should give it a try.  

Complex Flavors Expand Our Palate 

The more complex the flavor, the more it’ll expand what you’ll be willing to enjoy.  If you find yourself enjoying chili and cucumber popsicles, you might be more willing to branch out and try other options.

This is most important when you're raising a family and you want your children to have a balanced and interesting diet.  The more foods they try and enjoy, the more likely they'll be to want to try new things and be adventurous with foods and experiences.  This is a healthy way to spark curiosity in your children.

It Makes You Hungrier For More

Although capsaicin in a lot of spicy foods will lower your appetite: sugar can expand it and make you hungrier.  This means that the more sweet and spicy foods you eat and enjoy, the more you'll want!  If you're struggling to get yourself to eat breakfast in the morning but want to start doing it as a healthy habit, you can simply spread mango pepper jelly on your toast and watch as you start getting an appetite for it in the morning.  This can help create a more balanced lifestyle in the long run.  

There’s More Creativity in What You Can Make

If you realize you have a love for sweet heat, you may be more willing to try new combinations and flavors to see if you enjoy them, like candied spicy bacon or spicy hot chocolate to warm you in the winter.  Getting to be creative with these combinations will leave you excited to try new things and ready to introduce them to other people. 

It’s Awesome for Entertaining

One of the most nerve-wracking parts of hosting a party is waiting to find out if your guests like the food you're offering.  We all want to try something new, and give people the chance to have unique experiences, so creating something sweet and spicy for a party or event can allow people to try something new in a controlled environment where they didn't pay for it.  You might be able to spark a love for sweet and spicy combinations in someone else, which can lead to them wanting to swap recipes with you or try new things.  It's an awesome way to make friends or ensure you can keep the ones you have.

Sweet and Spicy Combinations Should Be In Every Diet

Whether you're ready to try new things or you want to stick to what's tried and true, it's a good idea to get to know all of the different flavors out there.  Sweet and spicy are a combination nobody could ignore.  

SHARE:

What Are the Different Types of Tequila Available?

Anyone who has tasted tequila can testify to its unique and exciting taste. It is a distilled drink that is produced from fermented blue agave plants. It originates from Mexico and has become a worldwide phenomenon. It is popularly consumed more in Mexico and the United States.

It is a unique liquor and can only be produced in certain regions of Mexico. These cities include Tequila, Jalisco, Nayarit, Guanajuato, Michoacán and Tamaulipas. Those produced elsewhere do not qualify to be regarded as such.

Tequila can be consumed in a variety of ways. This can be straight or neat without adding anything but taken as a shot. Some shots are taken with lime and salt. This is because the salt lessens its burn in the mouth and throat while the lime enhances its flavor.

Some people prefer to enjoy theirs by swirling it around a glass, taking in its aroma and then sipping it. A final way it can be consumed is by adding it as an ingredient in other drinks such as margaritas. You can check out this and more in this article.

Types of Tequila Drinks

Although tequila may be made from the same plant and the same region, they do not all taste the same. They are of different types and each one tastes differently from the others. Here are the five main types available.

Blanco
Blanco has several aliases. It can be referred to as Silver, White, Platinum, or Plata. It is the youngest tequila type and it is made from 100% pure blue Weber agave. Typically, it is freshly distilled and aged for only a few weeks which makes it sweet.

Because Blanco does not spend time in aging, it remains clear and silverish. Some distillers may age it for up to two months for a smoother taste. Blanco is also one of the best for making margaritas.

Joven
Joven is a Spanish word that means “young”. This drink is most times a mixto. A mixto means it is a blend of other drinks often Reposado, Anejo and Silver and other additives. It is golden in color and known by different monikers like Gold, Oro, or Dorado.

Joven gets its color from additives and flavoring agents such as caramel coloring and grain alcohol. If you find a Blanco bottle named Joven, it means is a mixto of some aged tequila with an unaged one.

Reposado
Have you like many asked what is a Reposado? Just so you know, it is a Spanish word that means “rested”. This name is in reference to this drink being aged in wood casks from between two months to one year. A lot of distilleries often age their Reposado in bourbon barrels. This adds bourbon flavors to the final product.

The process of aging Reposado adds some natural golden color and subtle hints of flavors like nuts, coffee and vanilla. This tequila can be enjoyed straight or used in cocktails. It makes margaritas more dynamic and full of flavors. 

Anejo
Anejo means aged. It is a drink that is aged for at least a year or more in oak barrels. What this does is that it loses its agave characteristics, turns amber and takes on the flavor of the barrel. It also results in a rich and smooth drink with hints of caramel and butterscotch.

Anejo can be likened to when tequila has been made to grow and lose its innocence. It is delicious and can be used as a whiskey substitute. The best way to enjoy it is neat or neat with water.

Extra Anejo
These are ultra-aged tequilas. They have been aged for a minimum of three years and are darker. It is mahogany in color with a complex and smooth flavor. They are usually best sipped alone instead of using it as a mix for other drinks.

Which Tequila Type is The Best?

This is based solely on what you prefer and whatever you intend to use it for. It is best to use either a Blanco or a Reposado for making margaritas. Anejo and Extra Anejo may also be used only that they would give your drink a caramel and oaky flavor.

Also, bear in mind that the more it is aged, the more expensive it becomes. This means Anejo and Extra Anejo are generally more expensive than the rest. You can checkout the guide to buying tequila here https://www.simplyrecipes.com/what_tequila_should_you_buy to learn more.

Conclusion
Tequila is one of the best liquors that you can drink. Like most drinks, it is available in different variants based on the age of the drink. The best type to choose is dependent on the drinker but the aged ones seem to taste better.
SHARE:

4 Dishes that the Whole Family is Sure to Love

Making meals for a family is hard, let’s be honest. Not everyone likes the same things, and you may be craving something fancier, while the kids want chicken nuggets. If your family is made up of fussy eaters, then good luck trying to find a meal that will please everyone. Luckily, we’re here to help. We’ll be giving you a few staple dishes that even the fussiest of eaters will enjoy, and that your whole family – young and old – can have together. These are also incredibly easy to adjust according to dietary preferences, and certain elements can be left out if someone in your family doesn’t want to try something new.

Steak
Steaks are a classic dish in most families. Very few people who eat meat don’t like steak. It’s also great for adjusting to each person’s preference, as you can alter the cooking time of each steak to change how the steak is done. There are various ways of making steak, so you can make it several times a month without repeating a meal. While any steak will be a hit, what will really impress your family is if you make them a steak to outdo all other steaks: the Wagyu steak. Wagyu steak is one of the most beloved steaks, and you can even decide on whether you want American Wagyu vs. Japanese Wagyu.


Pasta
Pasta dishes are great. If you add in enough ingredients, you don’t even need to make sides, which means less dishes! Plus, there are so many different kinds of pasta to be found – from the types of pasta, to the sauce, to the key ingredients . . . You can make a different pasta dishes each week and never run out of ideas. We’d recommend sticking to the classic mac ‘n cheese if you want to make everyone happy, but if you’re feeling adventurous, try this baked feta pasta that has been making the rounds on TikTok.

Fish and Chips
If you’re looking for a simple meal that will please young and old, fish and chips is the way to go. Even children who claim that they don’t like fish are unable to resist the crispy golden batter of fried fish. Of course, you can buy frozen fish already in a batter, but if you want to make an impression you can always try one of these basic batters.

Chicken Parmesan
Chicken parmesan is a dish that is so easy to make, but tastes so good that people will think you’ve spent hours slaving away in the kitchen. Chicken parmesan consists of a breaded chicken breast covered with tomato sauce and a cheese of your choice. To make it more individual, you can be modify it by adding different sauces to each family member’s dish, according to what they like best. Chicken parmesan makes a great dinner that will leave the family satisfied and full. To really make it a dinner they’ll ask for again and again, add one of these simple side dishes.
SHARE:

TikTok Feta Pasta Recipe

Many of you who use the TikTok app or even Instagram might have seen the viral recipe that originated in Finland for Feta Pasta. Apparently this recipe became so popular that grocery stores were completely sold out of feta. The basic idea behind the recipe is to start with cherry or grape tomatoes, a block of feta cheese, and seasonings that gets baked, and then pasta is added.  If you search the #fetapasta hashtag you will see thousands of videos showing so many variations. I admit I don't normally hop on the bandwagon with what's popular on TikTok, but I knew I had to try this dish. 

I was a tad nervous about the idea of using an entire block of feta and wondered if it would be overpowering. Good thing I didn't let that stop me, because the flavor was absolutely wonderful. It was tangy, but in the best way! I did check out several recipes so that I could get a better idea of what I wanted to do to make this dish my own. I shared my results on Instagram and received a lot of positive comments. It turned out that not too many people had heard about it, so I thought I was share a step-by-step recipe with pictures to show you how to make it. 

Here are the ingredients you'll need: 

Cherry or grape tomatoes (one pint per block of feta)
A block of  Feta cheese (can use vegan feta)
Fresh garlic (if cloves are huge, cut in half)
Fresh basil
Olive oil
Seasonings I recommend: Sea salt, cracked black pepper, red pepper flakes, and dried herbs like Oregano, Basil, parsley or Italian seasoning
Pasta of your choice (I used mini Farfalle)

Optional: 

fresh spinach
Grilled chicken or shrimp

How to make it

1. Heat your oven to 400°. Start by adding your tomatoes and garlic cloves to a baking dish, then drizzle with olive oil and seasonings. Make sure the tomatoes are well coated. Make a space in the middle of the baking dish to place your block of feta cheese. Drizzle more olive oil and add more seasoning. 
2. Once the oven has come to temperature, place your tomatoes and feta in oven and bake for 30 minutes. If want the tomatoes and cheese to get a little brown, you can broil on high in the last few minutes or turn on the convection feature if you have that option. Cook your pasta in well-salted water while this step in being done, and set aside one cup of the cooked pasta water. 
3. Take a large fork or spoon to lightly smash the tomatoes and mix it with the feta. Make sure to smash up your garlic cloves first so you don't forget, otherwise you'll have huge chunks.  

4. Now add your fresh basil and spinach. 

5. It's time to add your pasta and gradually add the pasta water depending on how saucy you want it to be. The pasta will absorb the liquid so I added the whole cup. I promise it won't be watery. 
6. Top with grilled chicken or shrimp and enjoy! 

Tips and recommendations: 

  • Do not skip the fresh basil or red pepper flakes. Both of them add so much flavor! 
  • If you can't get a block of feta cheese, crumbles will work just as well. Add it in the middle of the baking dish the best you can. You might need a larger size container, so keep that in mind. 
  • If you don't like feta cheese, you can use goat cheese or Boursin 
  • If you are making a larger batch, you can double the ingredients. Be sure to use a large enough baking dish to give enough space to add your pasta. 
  • I highly recommend reserving some of the pasta water to keep your pasta from being too dry. Do this by using a glass measuring cup or any heat-proof cup and scoop out some of the water from the cooked pasta before draining. You can add as much or as little as you like. 

Check out these other popular recipes: 

SHARE:

Perfect Roasted Salmon From Sitka Salmon Shares

If you're anything like me, you might be very particular about the food you buy for your family. When it comes to fresh foods, we tend to buy mostly organic, and almost all non-GMO only products. My husband is the one who does his research and makes his suggestions of what he would like for me to buy or what to avoid. One thing he does not mess around with is fish and seafood. He tells me to never purchase farm-raised fish. We end up spending a good bit more, but stick to wild-caught or locally-caught fish.

We were so lucky to get a special shipment of wild-caught Alaskan Coho Salmon and Pacific Cod courtesy of Sitka Salmon Shares. It's pretty wild (pun intended) to receive fish that was caught by fisherman and blast-frozen to maintain the freshness.


Sitka Salmon Shares is:

  • Wild: Wild-caught from the pristine waters of Southeast Alaska and the North Pacific
  • Sustainable: Harvested using hook-and-line methods to minimize negative ecological impact
  • Traceable: Our relationships ensure that your fish is traceable to the boats of our fishermen-owners and trusted community partners
  • Fishermen-centered: Individually caught by one of our fisherman-owners or partner fishermen (who we hope are on their way to ownership!). Fishermen ownership makes us distinct from our competition and creates a more just system that values hard work, high-quality fish and low-impact harvesting methods.
  • Just: Our fishermen receive an average of 20-30% more for their harvest, which can equate to $10,000 extra income in a given season
  • Premium: Blast-frozen at the peak of freshness to ensure the highest quality, guaranteed
  • Convenient: Home delivered directly to your door, with recipes and a newsletter about the fishermen who caught that month’s share
  • Conscious: Carbon offsets purchased and 1% of revenue donated to efforts promoting small-scale fisheries and conservation in Alaska.  

How does Sitka Salmon Shares work? 

Community Supported Fishery (CSF) members purchase their very own "shares" of their harvest. Similar to preorders or vegetable shares ordered through your favorite CSA, these purchases determine how much fish their fishermen catch! After that, CSF members receive a monthly home seafood delivery - their "share" - of their wild Alaskan catch, ranging 4.5-5lbs per month and ranging 3-9 months during the CSF season (April thru December). Prices range from $18 to $28 per pound, depending on the species you choose and the quantity you buy. Shipping is also FREE, which is a plus! 

You're probably wondering if the fish is worth it or not. Let me tell you, it is beyond worth it. My husband and I both agree that it is the absolute best salmon we have ever eaten, period! Even better than what we have had from some swanky high-priced restaurants. I simple placed the sealed packs of coho salmon in the kitchen sink with enough water to submerge it. The salmon thawed quickly and I was completely in awe of the beautiful color. I did find some pin bones that I was able to pluck out. I always judge any fish by the smell. This salmon smelled clean and ocean-y, not overly fishy. If fish smells too fishy, I won't mess with it. 


The way I make my roasted salmon is quite simple. I start with rinsing the fish and patting it dry with paper towels. I place them on a parchment lined baking sheet. Next, I season with a blend of sea salt, freshly cracked black pepper, creole seasoning, complete seasoning, and garlic powder. I then lightly rub the dry seasonings onto the fish filets, and top with fresh dill sprigs and lemon slices. The last step is to melt 4 tablespoons of butter and drizzle it over the top of the filets. I place the fish in the oven set on broil for 3 minutes, and then at 395° on the convection setting for 10 minutes. If you do not have the convection feature, you might need to add a few additional minutes of cooking time. 


I squeezed some fresh lemon over the top of the salmon when it came out of the oven. I had to sneak a little piece before I plated it and it made me close my eyes. The salmon completely melted in my mouth! SO GOOD! I served the roasted salmon with some simple maple brown sugar mashed sweet potatoes and sauteed asparagus. This was a high-end restaurant-quality meal without a doubt. 


Getting hungry? If you use this special discount code - SITKA25, it will take $25 off any 2020 Premium Sitka Seafood Share. Be sure to follow Sitka Seafood Shares on Facebook and Instagram for the latest product updates and recipes. I definitely plan to cook the cod in a couple weeks. I will browse some recipes and decide from there. My family will co-sign when I say that I highly recommend trying Sitka Salmon Shares. 

Many thanks to Sitka Salmon Shares for providing a seafood box for my family to try. All opinions are my own as always. Thank you for stopping by today. 
SHARE:

How BI-LO Delivery By Shipt Saves Busy Families Time

This is a sponsored post in partnership with Shipt + BI-LO. All opinions are my own. 

Do you ever find yourself at home browsing recipes on Pinterest, and you find the perfect dinner or dessert recipe that you actually have all of the ingredients for? Yeah, me either. I always seem to be off by one or two ingredients. It's hard for me since I do not have access to a vehicle during the day, so this means waiting until after 5:30 before any of the working adults get home. By that time, it's too late to try to put dinner together after getting to and from the store.

I am so grateful to live in the age of technology where you can get just about anything you need, sometimes as quickly as you need it. Thankfully Shipt grocery delivery service is available for the days I can't get to the store right away. Shipt is a membership-based service that you can join with an annual or monthly subscription, and you can cancel at any time. I'm thrilled that they now deliver from BI-LO stores.

Right now if you become a new Shipt member, you can get 2-weeks of same-day delivery free, and receive a $20 credit on your first order from BI-LO! Who doesn't want FREE groceries? Now all of those recipes that I want to make can actually happen. Shipt grocery delivery is not only convenient since you don't have to leave your home, but it helps prevent all of those unnecessary purchases. I can't ever seem to not have that urge to buy things that are not on my list for a variety of reasons. Also, not having to make a trip to the grocery store is a huge time saver, especially for busy families.

I was super excited to make my first order from BI-LO using Shipt. This just happened to be one of those times where I seemed to have run out of so many of my kitchen and household staples at the same time. Also, since it is the baking season, I stocked up on a few baking supplies so I won't run into the issue of not having all of the ingredients for a recipe. But you know what? If I do run out it's no problem! I can just log into my Shipt account and make a quick delivery order, and receive my items in as soon as one hour. As long as I keep my order $35 or more, my delivery is free.


I feel like once you get Shipt delivery, there is no turning back. I enjoyed receiving my groceries from BI-LO, and I look forward to placing my next order. My Shipt shopper alerted me via text when she made it to BI-LO and asked if I needed any additional items. She shopped my order, and as soon as she was done, she texted me to let me know she was on the way to my home. You can start your Shipt account online or through their free app available through your phone's app store. Don't forget to take advantage of their special promotion to get your $20 credit to shop at BI-LO.


So now the question is which dessert or entree do I make first? I guess the next thing I need to work on is my meal planning. That's definitely not my favorite thing to do, but at least I can grocery shop in my pajamas! If you have any questions about BI-LO delivery by Shipt, leave me a comment or send an email. Thank you for stopping by today!
 photo 7636c3fb-e8d9-4b07-af6b-f1ca33a15bfe_zps9lbkp4mn.png
SHARE:

Easy Small Batch Homemade Mac and Cheese Recipe

For ages, macaroni and cheese has been one of those quintessential comfort foods that most anyone enjoys. Of course, it is not considered a diet-friendly dish, but we don't really eat it for that reason, to begin with. Nothing beats a nice creamy, cheesy scoop of homemade baked macaroni and cheese. There is something irresistible about the corner edges that crisp up just a little while baking that is the perfect texture and bite.


Growing up Guyanese, our macaroni and cheese wasn't like the classic American style. Ours had extra things in it like onion, scallions, and hot pepper. It was also baked firm so it could be cut into thick slices. While it was still delicious, I always preferred the more classic version. One of the things that can sometimes be a turn off when making mac and cheese is having such a huge amount left over. While that might not be a bad problem to have, some of us do not want to have too much of a good thing.

I have been working on a small-batch mac and cheese recipe that is perfect for smaller families. This recipe is so good since it doesn't require a lot of ingredients, and doesn't take a whole lot of time to prepare. Of course, you can always make a double batch for larger families, potluck meals, or if you simply can't get enough. Check out the recipe below.

Ingredients:

1 1/2 cups elbow macaroni (uncooked)
3 tbsp butter
3 tbsp all purpose flour
1 tsp Cajun or Creole seasoning (optional) OR 1 tsp salt and pepper to taste
2 cups shredded sharp cheddar cheese
2 cups milk

How to make it:

1. Heat oven to 350°. Cook pasta according to package directions in well-salted water, then drain. 
2. While pasta cooks, melt butter in a large saucepan and add flour. Whisk until butter and flour are well combined. Add Cajun seasoning, salt, and pepper. 
3. Whisk in milk and bring to a low boil, until slightly thickened. 
4. Add shredded cheese, reserving a little to sprinkle on top for baking. 
5. Add in drained pasta to cheese sauce mixture, then pour into a 9x9 baking dish. Top with remaining cheese and bake for 20-25 minutes.  
Tips: 
  • Sprinkle either cayenne pepper or paprika on top before baking for extra color and flavor. 
  • Crush buttery crackers and top before baking if you like extra texture and crunch. 
  • Add ham or crumbled bacon or turkey bacon, and sweet green peas or green onions to make it an entree. 
  • You can experiment with other types of cheese like Swiss, colby-jack, or gouda. 
  • Make this dish vegan by using plant-based butter, cheese and milk. I have made it before and t comes out great! 
This small batch mac and cheese is sure to please anyone who wants an ooey-gooey comfort classic. As a matter of fact, it's so easy to make that it can be whipped up in no time, even on a school night. You can Pin this recipe for later.


Be sure to check out these other delicious recipes:
Shelly's Easy and Moist Meatloaf
Air Fryer Chicken Thighs
Perfect Greek Pasta Salad
SHARE:

Perfect Greek Pasta Salad Recipe

We are in the heart of the summer weather here in South Carolina. The scorching sun and humidity do not push me to want to be in the kitchen for very long. I have been utilizing my air fryer a lot to avoid going outside in the heat to grill or to have to turn on the oven. It seems to take forever for my house to cool down once the oven is on. I have been making a variety of lighter dishes, as well as salads. I came across a recipe for Greek pasta salad from Skinnytaste and decided to try it out. I did make a few adjustments because I felt like some of the fruit and vegetable quantities were way too much.

One thing that I love about pasta salad or potato salad is that you can make enough for leftovers for the next day or two. When I made this pasta salad, I was afraid it was too much for my family. It turned out to be so delicious, that it all got devoured over the course of a few days. The recipe is super simple and is definitely one you will want to hang on to. It makes a great side dish for family meals and cookouts.


Greek Pasta Salad

Ingredients: 
one 16-ounce box of pasta (Bow ties or rotini work well)
2 cups of diced English cucumber (skin on)
1 small orange bell pepper, diced
1 small red bell pepper, diced
1/2 of a small red onion finely chopped
1/2 pint of either cherry or grape tomatoes sliced in half
4 ounces crumbled or cubed Feta cheese
1/2 cup of kalamata olives sliced in half

dressing:
1/3 cup olive oil
3 tbsp red wine vinegar
2 tbsp kalamata olive brine
2 tbsp fresh lemon juice
1/2 tsp garlic powder
1 tsp dried oregano
1 tsp Kosher salt
cracked black pepper (optional)

How to make it: 

  • Boil pasta in well-salted water according to package instructions. Test for desired doneness and drain. Rinse with cold water, and let it cool at least 10 minutes. 
  • Whisk together all of the dressing ingredients.
  • In an extra-large bowl, toss pasta, chopped fruit/veggies, and dressing together.
  • Add feta at the end. 
Refrigerate and enjoy! Be sure to Pin this recipe for later. 

You might also enjoy these recipes:


Thank you for stopping by today!
Shelly
SHARE:

The Best Keto Pizza

We have been steadily working on eating fewer carbs and lower sugar in our house. Of course, there are those days when we crave a good old-fashioned slice of pizza. I decided to try a keto pizza using a basic low-carb mozzarella (fat head dough) recipe. I have heard others say that it is just as good as traditional pizza, and it turns out that they are right! The vegetable pizza I made surpassed my expectations. Even my daughters were super impressed. If you are living the lower carb lifestyle, you must try this pizza recipe.


Ingredients: 

1 3/4 cup shredded mozzarella
2 ounces cream cheese
3/4 cup almond flour
1 egg, lightly beaten
pinch of salt (optional)

For the toppings:
thinly sliced red onion
thinly sliced fresh mushrooms
fresh spinach
shredded mozzarella
pizza sauce (you can use low sugar)

Extra items you need:
Parchment paper
Rolling pin
Pizza pan or flat cookie sheet
wooden spoon

Directions:

Heat oven to 425° and line your baking sheet with parchment paper. In a microwaveable bowl, heat mozzarella and cream cheese until melted, about one minute. With a wooden spoon, quickly mix in the rest of the ingredients. You need to then use your hands to combine the dough a bit more so all ingredients are better incorporated. Next, place dough ball between 2 sheets of parchment paper and roll dough into desired shape. Transfer dough to baking sheet and poke holes all over the surface with a fork. Now place in preheated oven for 12-14 minutes. You will see it start to brown quickly in the last couple of minutes. 

Remove from oven and top with pizza sauce, vegetables, and cheese. Return to oven for 5 minutes or until you reach the desired color and cheese is melted. You can sprinkle some crushed red chili flakes if desired. Slice and enjoy!


You can add any toppings you like, but if you do use any meats, be sure they are precooked since the final baking is just enough to melt the cheese. This pizza, paired with chicken wings cooked in the air fryer will be our new Friday night dinner to replace takeout. I'm surprised by how easy is to make!

Be sure to check out these other low carb and Keto recipes:

SHARE:

Simple Fried Mushrooms In The Air Fryer

One of my most favorite times of year is when the South Carolina State Fair comes to Columbia. I used to enjoy the rides in my younger days, but now it is all about the food. I don't think anyone goes to the State Fair with the expectation of eating healthy food. If you do, you might be going to the wrong place! One of my state fair must-haves, aside from the sweet treats, is the deep-fried mushrooms. You can smell them cooking from what seems like a mile away. As much as I love them, I do find that I start feeling a little queasy after a while because the oily fried taste starts to get to me. 

I got an air fryer a few months ago and decided to experiment and make my own "fried" mushrooms at home. They were so simple and delicious that I knew I had to share the recipe. You can't go wrong with the perfect crispness without the grease or guilt. 

Ingredients:

fresh mushrooms, cleaned with stems trimmed and cut in quarters
egg, slightly beaten with a little salt and pepper
seasoned bread crumbs
extra virgin olive oil

How to make them:

Preheat air fryer to 400° for up to five minutes. Dip your mushrooms into beaten egg, then coat in bread crumbs. Once your mushrooms are breaded, carefully add them into your fry basket. Spray with olive oil or whatever oil you choose. Cook for 4 minutes and then shake basket to toss mushrooms around. Let them cook for about 4 more minutes or until golden brown. Serve with ranch or condiment of your choice.


Tip: You can add a little grated parmesan to your bread crumbs for a bolder taste. You can also use this recipe for other vegetables like zucchini. I also recommend getting an oil spray bottle like this one for your olive oil. It has been the best thing to use with my air fryer since cooking sprays can cause damage to the unit, and olive oil is healthier.

If you have an air fryer and love mushrooms, you have to try this recipe. If you don't have an air fryer, you are missing out!

Also, check out:
Air Fryer Chicken Thighs 
Perfect Greek Pasta Salad
The Best Keto Pizza

 photo 7636c3fb-e8d9-4b07-af6b-f1ca33a15bfe_zps9lbkp4mn.png
SHARE:
Blogger Template Created For Mom Files All Rights Reserved